Tuesday, 31 August 2010

Hazelnut Mocha Cake


You must be wondering what is healthy in it!!! Well... read on to find out how! Healthy eating does not mean all soups and salads. Sometimes you also can satisfy your sweet tooth while taking care that it does not make you deviate from the healthy eating path :) This recipe does not need any butter.

This is a very easy-peasy cake and utterly delicious. Initially when I heard the name I thought this must be something very complex but I made things simple. This thought just flashed suddenly in my mind on one afternoon when putting my baby to sleep. When I checked my food cupboard I had everything that I needed. There was no reason to wait.

As usual I made this with wholewheat flour.. I used nutella (it has hazelnuts and chocolate) and instant coffee granules.. so there you go.. hazelnut mocha (coffee and chocolate) cake... It was so yummy and such a great accompaniment at tea-time or as a dessert after dinner.


Here is how I made the cake.

Ingredients

Wholewheat flour - 2 cups
Nutella - generous 2 tbsps
Muscavado Sugar - 1/2 cup - Nutella has all the subtle sweetness you need so you wont need that much sugar
Vegetable Oil - 1/2 cup
Eggs - 2
Instant Coffee granules - 4 tsp (dissolved in 1/2 cup hot water and cooled)
Baking Powder - 1 tsp
Roasted chopped hazelnuts - Optional - 1/4 cup - I didn't have any in my cupboard but you could use it.

Method

Preheat the oven to 180 deg C
Butter the cake tin and keep it ready.
In a large bowl beat the eggs well.
Add the sugar and oil and beat until they are well mixed.
Add the dissolved coffee and the nutella and beat again.
If you are using chopped hazelnuts add them to the wheatflour and mix them.
Now add the flour, baking powder to the egg mixture and mix them.

Tip the whole mixture into the cake tin and bake it for about 45 minutes. Check the cake with a tester or a clean dry knife for doneness.

Dig in...

Tuesday, 24 August 2010

Steamed parcels of goodness.. Rava Idlis...


I have always had problems with making traditional (urad dal/rice) idlis, fermentation being the most difficult part. Lately, I had mastered that also by using the oven. The idlis used to turn out perfect, fluffy and well cooked. Who would want to resist these yummy goodies dunked in sambar and chutney... not to mention the hot fresh coffee to accompany it... :)

Given all the yummy points about traditional idli, when you run short of time and/or energy, this one is a perfect breakfast/lunch/dinner option. You can make them in a jiffy, they are absolutely healthy since they are steamed and I also added a vegetable to it.

Here is how I made them... The quantity given below made 12 idlis.

Ingredients:

Rava (Sooji) - 1 1/2 cups
Carrot - 1 - Grated - You can use chopped green beans, grated zucchini, finely shredded cabbage anything...
Green Chilli - 2 - finely minced.
Coriander - Finely chopped - a handful
Yogurt - 1 1/2 cups
Salt - to taste
Oil
Mustard Seeds - 1/2 tsp
Channa dal - 1/2 tsp
Hing - 1 pinch

Method:

Heat up some oil and when hot, add mustard seeds to pop.

Add the channa dal and hing and let the dal turn golden brown.

Add the rava and roast until the rava is well cooked. (If you store roasted rava this is even faster)

Once well mixed, remove from heat and add the grated carrots, chopped coriander, minced green chillies, salt and the yogurt, mix it all together.

If the mixture is very dry-ish, add some room temperature water to loosen it up. Basically we are trying to get the idli batter consistency here. Adding more yogurt is also fine. Use your judgement.

Leave the mix alone for 15 minutes.

Apply some oil on the idli moulds, Spoon the mix in them and steam for 8 - 10 minutes. But do check at 6 minutes because mine was done in 6 minutes (I used a microwave idli maker and my microwave is a bit too powerful).


Enjoy with some sambar, chutney or just as it is with some coffee. We found hummus goes well with these too...

Thursday, 19 August 2010

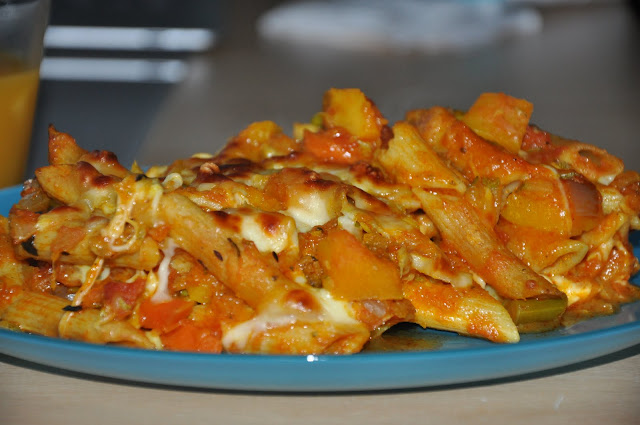
Penne pasta bake with butternut squash


It was just a couple of months ago that I realised how tasty this squash can be when used in pasta. I used to make usual Indian curry with this vegetable which used to turn even the spiciest curry into a sweet one... I even tried it with some coconut milk gravy but the taste was not very good.

I watched Giada using this in a pasta dish which really was looking very interesting. This vegetable is so healthy as it is rich in beta carotene... also many other vitamins and minerals... above all this cooks in a jiffy... just as the pasta cooks the sauce will be ready.. which works out for me just right.. These days I have started making one-pot dishes more frequently as I want to spend the precious evenings with my baby and husband for a family walk or at the park rather than in the kitchen making traditional meals..

Will tell you about a secret in a while.. before that.. here is how I made this

Ingredients

Wholewheat Penne - 250 g (Serves 4)
Butternut Squash - Peeled and diced - 3 cups
Onion - 1
Tomato - 4 ( I used canned tomatoes and they had some basil added to it which was very nice but this is optional)
Garlic - 3 to 5 pods
Reduced fat Cheddar or Reduced fat Mozzarella - 250 g - Grated
Salt and pepper - to taste
Italian Seasoning - Optional

Method

Cook the pasta in plenty of salted boiling water until they are just cooked but have a bite.

In the meantime saute the onions and garlic in olive oil. Add crushed black pepper.

When the onions are translucent add the tomatoes and cook for a minute until they give out the juices and turn mushy. If you are using canned tomatoes, just give it a minute to cook and bubble away..

Add the squash cubes along with a big ladleful of pasta cooking water.

Mix, cover and cook for 5 minutes until the squash is tender. Add salt to taste and some crushed black pepper.

Using a potato masher, mash the squash to form a nice and chunky sauce. Add the Italian seasoning if you are using.

Strain the cooked pasta and add it to the sauce.

Baking

You can actually mix the cheese into the sauce and pasta and then transfer them to baking dish but I did it this way.. (just this time) You can even make a more cheesy sauce - Simple- Add 2 tbsp of wholewheat flour to the pan after mashing the squash. Once well mixed add a cup of semi skimmed milk and whisk thoroughly. Add the cheese and remove the pan from fire to let the cheese melt slowly before adding the pasta.

In a baking dish place half of the pasta mixture. Top it with a half of cheese (if you are not making cheesy sauce) and repeat the layers and sprinkle with the remaining cheese over the top. Make sure you have enough cheese on the top to cover the whole baking dish to make it decadent and mouth-watering..

Bake this in a preheated oven (200 deg C) until the cheese is melted on the top and is golden brown and the sauce is bubbling nicely. Enjoy the sizzling sound while the dish comes out from the oven...

We enjoyed this yummy pasta with a glass of juice... :)


Now for the secret: I actually mixed the left over mixed veg curry into the sauce which gave it a great twist in flavour... But make sure you plan these things before starting to make this dish so that you can adjust the salt and spice level in the pasta. :)


Tuesday, 17 August 2010

A Warm Welcome with a blueberry cake...


Hi Everyone! Thanks for visiting my blog.

I look forward to a fabulous time here sharing a few of my culinary experiments inspired by other bloggers, TV programmes and personal eating out experiences.

I must confess that my knowledge in cooking is very very basic and it is only recently that I have started to get my hands wet in baking... Some of my close friends know what were the outcomes of a few of my cakes, cookies when I started baking.... but with time and with the mistakes I am learning

A very warm welcome with a cake I baked today! Blueberry cake... As the title of blog goes... a healthier version of the cake. I am very health conscious and I try to substitute healthier alternatives in any recipe to make it a bit guilt-free...


I dont have many gadgets in my kitchen except the basic things... but I dont think that stops me from doing what I want...

The cake came out really good... Though I was a bit worried that the batter was not that loose as I wanted it to be, the cake was so moist and perfectly cooked... may be because of the blueberries.. they burst and released the juices which kept the cake perfectly moist and yummy...


Here is how I made the cake:

Ingredients

Wholewheat flour - 2 cups
Blueberries - 100 grams
Eggs - 2
Baking Powder - 2 tsp
Caster Sugar - 1 cup (I like my cake not-too-sweet, You can put a half cup more if you like it sweeter)
Mixed seeds - Optional - a handful (I had a pack of mixed seeds and I used them up)
Butter - 1 tsp
Sunflower Oil - 1/2 cup
Orange Juice - a little

Method

Preheat the oven to 180 deg centigrade.

Break the eggs into a bix mixing bowl.
Beat them until the yolks break and everything is mixed and light yellow in colour.
Add the sugar and beat well.
Add the butter and give another round of whisking. You will find small bits of butter but dont worry they all sort themselves out in the oven.
Now add the oil, orange juice and mix.

Mix the baking powder to the flour nicely.
Add the blueberries and seeds to the flour.
Add everything to the wet mixture.
Give a final mix thoroughly and tranfer the contents into a buttered cake tin.

Bake the cake for 40 - 45 minutes or until the cake tester comes out clean.

Best made at tea time to see the cake disappear in minutes.